Showing posts with label miscellaneous. Show all posts

Monday, July 15, 2013

My process for photographing artwork and how to do it for under $300

A quick note: Some people debate the choice of manufacturers and if the brand matters.  Basically, it doesn’t.  The examples in this article are shot using Canon cameras and lenses, though I believe that the results would be near identical using any major brand of camera gear.  The big picture truth is that the differences between brands are minute in terms of the end results and each company is constantly striving to be competitive with the latest offerings.  Once upon a time the differences might have been more dramatic, but digital photo technology has advanced to the point that any new camera should be able to provide satisfactory results if used properly.  I’m a Canon user because that is the system which I chose to invest in and I am very happy having made that choice, though I fully support comparing options and getting whatever suits both your needs and your budget.

There are plenty of tutorials on photographing artwork available and I encourage you to read through those as well, because I don’t believe any one method to be the one true way.  That said, I’ve read a number of those other tutorials and felt that it might be helpful to some people to share my own method which I’ve developed over the past ten years.  I’ve gone through many different processes, set-ups, and cameras and shot several hundred paintings over that time and have come to adopt a work-flow which is fast, simple, and potentially very budget conscious.  The goal here is to demonstrate how to achieve clear, accurate photos of your artwork for the purpose of reproduction in a streamlined fashion.  This may look like an impenetrable wall of information, but it is really very simple and fast to implement once you get a handle on it.  Using this method, I generally get great results on the first shot with a total time of less than a minute to set up and shoot, and then another minute of digital processing.  I also want to demonstrate that, though I recommend using the best equipment available to you, professional print quality results are completely possible on a shoestring budget.

Tools Required:
To begin, there are a few basic tools which are absolutely essential.

A Camera.
Choosing a camera is itself quite a broad topic because there are so many options to get confused by.  If you are working on a tight budget ($100-$500), you’ll likely be looking at point and shoot or pocket sized cameras.  If you want something more advanced, you’ll be looking at DSLR (entry level kits start around $500).  *edit* and Mirrorless, added below...


Point and shoot:
When shopping for a point and shoot to photograph paintings with, there are a few key features to look for.  The first and most important is to find a model which will allow you as much manual control as possible.  Many point and shoots only have auto and semi-auto shooting modes and this can be limiting for shooting artwork.  A camera which lacks manual controls also almost certainly does not allow you to record files in RAW format, another concern for getting high quality reproductions (particularly if you need to print your images large).  The third concern is to find a camera which has at least a 10-12 megapixel sensor.  Megapixels are counted by multiplying the number of pixels across an image by how many pixels tall it is and then dividing by one million.  A ten megapixel image is literally made up of roughly ten million pixels.  The more pixels, the higher the resolution (and therefore print size) of the images it records.  If your camera records in RAW, there are also ways in post processing to increase final resolution significantly, though it is always best to start with the most pixels possible.  Because megapixels are really just a measure of area using pixels (like measuring space using square feet), the benefits become less dramatic as the number increases.  10 mega pixels is enough to get a print quality image with at magazine size.  The logic dictates that more is better, though I have read that cramming too many pixels into too small of a sensor (as is found in this class of camera) can give poor results so don't get too caught up in megapixel fever.

Here are some current point and shoot models which shoot in RAW mode, allow a great deal of manual control, and have decent resolution: 

Nikon Coolpix P7700
Panasonic Lumix LX-7
Canon Powershot G-15
Canon Powershot SX50 HS
Canon Powershot S110
Fujifilm Finepix HS30 EXR
Olympus XZ-10

I believe these generally retail between $300-$500 new, though you could likely find used or earlier models for less.  If buying earlier models, just be sure to double check their specs.  My point and shoot samples in this article is a Canon Powershot S90, which is a predecessor to the S110 and currently sells used on Ebay and Amazon for about $200.
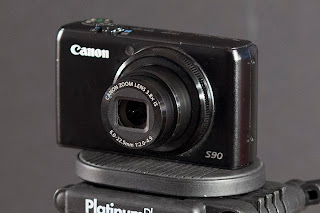

Canon Powershot s90, available used for about $200. 

*edit*
Mirrorless:
I realize that I made a major omission by not mentioning Mirrorless, which is a relatively new alternative to DSLR that is typically smaller and more affordable but competitive in quality.  Some are comparable in size and price to point-and-shoots but additionally allow the use of multiple lenses and tend to be much more likely to give manual control and RAW.  Most importantly, they tend to have significantly larger and more capable sensors for capturing the image.  This is a system worth looking into, especially for the budget conscious.  Nikon, Olympus, and Panasonic all offer body and lens kits for as low as $300 brand new as of this writing and quality reports have largely been impressive.  For a little bit more ($500+) you can get kits which rival DSLR in image quality and features, and some which even share identical innards in a more compact frame.  I left the point and shoot segment above in the interest of providing more info and options, though as these two types of camera are on overlapping pricepoints, I'd say buy a mirrorless instead.

DSLR:
DSLR, or Digital Single Lens Reflex, is the option for those looking for higher quality and control.  One of the most obvious differences between pocket cameras and DSLR is that, due to the larger sensor size, DSLR potentially delivers significantly higher resolution.  I recommend going the DSLR route if you have the budget.  Even the most basic entry model DSLR should cover all of the features mentioned above, though you should always double check to be sure (particularly if buying older model used equipment).  That being the case, I won’t go into the details of crop vs. full sensor or any of that being as it won’t make much difference to shooting artwork.  While the differences between entry level and professional level DSLRs can be quite pronounced, any of them used properly will do just fine for reproducing art.  I do advise investing in a good lens though.  For general photography you’ll likely want something in the standard zoom range (24-70), though I like shooting telephoto for paintings.  My go-to lens for shooting art these days is a high end 70-200 and I typically shoot in the middle of that where distortion is lowest and image quality is sharpest.  More on this in a bit.

*edit* I've been asked about macro lenses.  One of the primary features of a macro lens is the ability to focus extremely close to your subject which is not really relevant unless you happen to work at miniature scale.  What is a relevant feature, however, is that macro lenses also tend to have higher image quality and rendering.  Theoretically, they will deliver a higher standard of image quality, though there are really good non-macros out there which could give near identical results.

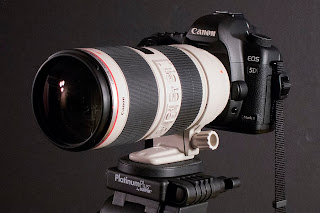
Canon 5Dmk2 with an EF 70-200 f2.8 IS2 attached.  My weapon of choice for shooting artwork.  Buying the non-IS version of this lens will cut the price of the lens in half and still deliver the same results for tripod mounted shooting.

*edit* I've since switched to using a Zeiss 100mm f2 macro lens.  In a blind taste test it would be six of one and half a dozen of another on the final processed image and, for its "limitations" (no af, no zoom range) the Zeiss would not sway an average buyer even at one stop faster, considerably smaller, and less expensive.  That said, it is the highest definition and least distortion lens which I've ever used, focuses close, and is really pretty to look at.  All that said, I'm sure you could get super results with the Canon brand 100mm macro at half the price of the Zeiss.  At a certain level, the differences get very subtle.

Tripod.
For my method of shooting artwork, a tripod is essential.  It doesn’t have to be anything fancy, but I recommend something reasonably stable.  My $50 Sunpak 7500 served me well for years.  Of course there are cheaper choices as well as much much more expensive ones, but the important thing is something which isn‘t going to wobble.

Lights.
This is always the sticky issue for artwork.  I used to work with expensive and bulky photo strobes, but they are really a pain to deal with if you don’t have a dedicated photo studio.  Some people also recommend the outdoor method shooting in shade or on an overcast day, though I find that to be even more inconvenient (especially considering how often I’m shooting a painting late at night to make a deadline).  In the end, I’ve found I get fantastic results using a couple cheap tree style floor lamps from target (each fitted with three 100w natural spectrum bulbs).  As a bonus, they also do a nice job keeping my studio well lit.  An alternative to those could be $12 clamp lights from the hardware store fitted with as bright of natural spectrum bulbs as the will safely accept.  I highly recommend natural spectrum bulbs over regular incandescents.  I think the brand I buy is Reveal.


$20 from your local Target
Software.
You will also need photo editing software and ideally a RAW conversion program.  I use Adobe Photoshop and Adobe Lightroom and get both (along with everything else that Adobe makes) for $50/month through the creative cloud subscription service.  I think individually they are $20/month each.  Photoshop will do basic RAW conversion without light room, but the options are so limited that it almost isn’t even worth it.  Lightroom is not a must-have, but I recommend giving the free trial a spin and deciding for yourself.

WHY SHOOT RAW?

For those unfamiliar with the RAW format, this is a file type which some cameras offer that saves all data pertaining to an image without any compression added.  If you are not shooting in RAW, your camera is disposing of data and compressing the image into a jpeg file when it writes the file to the camera card.  This can limit your options in later editing.  Among other things, RAW gives you extremely accurate color as well as the ability to correct a poor exposure.  Perhaps most impressively, RAW also allows you to cleanly upscale images far larger than possible with a jpeg.  I’ve increased RAW files from 18 inches tall to 56 inches tall and still had solid sharpness and image quality.  Try that with a jpeg and see what happens.

The Three Elements of Exposure:
Before getting into camera settings and lighting set-up, I want to give a brief explanation of the three key components which will affect your exposure.  These are ISO, Aperture, and Shutter Speed.  For this tutorial, two of these are very important and one is not important at all, but all three should be understood.

ISO.
In the days of film, ISO was the “speed” of the film that you put in your camera.  The higher the ISO number was, the more sensitive to light and the coarser the film grain.  An ISO of 100 was recommended for bright sunny days and an ISO of 400 or 800 was better for dimmer indoor shooting.  As the number increased, the image quality decreased.  The same is true in digital photography.  Every digital camera has a range of ISO settings which can be adjusted for different lighting situations.  Modern DSLRs tend to give relatively clean results for high-ISO shooting, but the ideal is generally 100 (with the exception being Nikon, which I understand is 200) if you want the absolute sharpest clearest image possible.

*EDIT* I've since learned that my specific Canon model (the 5Dmk2) has ISO optimized the 160, not 100.  The difference is slight but visibly cleaner in dark areas.  If you're looking to squeeze every ounce of quality from your images, shoot some test shots and compare results.  Also, my personal tests differed slightly from the official Canon charts (they indicated ISO 640 would be best but it isn't, at least not for me) so it always pays to check with your own eyes.

Aperture.
The aperture, or f-Stop, is the adjustable opening inside the lens which regulates how much light passes through to the shutter.  As you change the f-stop, the opening gets larger or smaller.  Some lenses are capable of allowing in significantly more light than others, thus allowing for faster exposures.  This is what people are referring to when they talk about a lens being “fast” or “slow.”  The lower the f-stop number, the more light is being allowed to pass through.  Typically, shooting with the aperture fully open will give a softer image and possibly darker corners (vignetting) so it is not the ideal setting for reproducing artwork.  Likewise, shooting with a very tiny aperture will cause diffraction which will also result in a soft image (similar to the effect of squinting your eyes).  Though it varies from lens to lens, all have an ideal setting for optimal sharpness.  With DSLR, that setting is commonly between f8 and f11, but may be lower for faster lenses (I shoot f5.6 on an f2 lens).  Point and shoots tend to have much more variety to the aperture ranges which they allow so it is hard to give a standard go-to, but your safest bet is to avoid the extremes.  Zooming may also limit the range available.  It never hurts to shoot controlled tests at each f-stop to determine the optimal sharpness for any piece of equipment.

Shutter Speed.
The amount of time which the shutter is open when taking a photo is, you guessed it, shutter speed.  Typically shutter speed is tremendously important if you are either shooting hand-held and/or shooting pictures of moving subjects.  Since we are doing neither of these things, shutter speed is not a major concern using this method.  In fact, we will use that to our advantage by sacrificing fast shutter speeds to allow for ideal ISO and Aperture settings.

Your camera settings:
Av Mode (aperture priority)
ISO 100 or 200 with Nikon
Aperture: f8 (DSLR) or middle of the range (point and shoot)
Shutter Speed: the camera will decide when shooting in Av Mode
File Format: RAW
Self-timer: on

Lighting and Artwork Position.
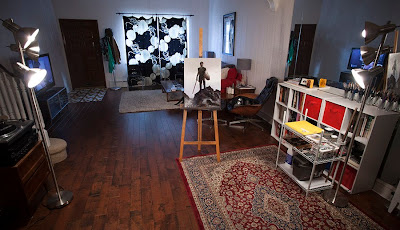
You should have your lighting set up so that it falls evenly across the surface of your artwork with an equal amount of light coming from both sides.  If your room has an overhead light source, you probably want to turn it off.  Position your artwork on its easel so that it is somewhat low to the floor and as close to vertical as you feel safe with and position the lamps to either side so that the light rakes across at about a 20 degree angle.  You don’t want to have the angle too shallow as this will accentuate any surface texture and inconsistencies, though if you have it too deep it will bounce light into the camera and cause glare.  When at an appropriately shallow angle, the light will bounce across usually without causing glare.  You want, if possible, to have the artwork facing a dark wall.  Anything bright in the room, such as white walls, floor, ceiling, or your t-shirt, may reflect in the surface of your artwork, especially if the image is dark and/or shiny.  If need be, you might even buy a black sheet to hold up behind the camera to reduce room reflections (I do this often on problematic paintings.)  To aid in color-correction, you may also want to place a white sheet of paper (or more sophisticated color correction materials) above or next to your artwork so that it is receiving the same amount of light.  Additionally, I like to shoot paintings while still wet or with a coat of retouch varnish to bring out the richness of the color and contrast, though this may make the image more reflective and problematic if it is large and/or dark.

The spacial distortion of this photo give the illusion that the lamps are at a steeper angle than recommended, but you get the general idea.  You'll have to fuss things around awhile until you figure out what works best in your space.  That said, it's really this simple.  For those with a keen eye, you'll notice that I also had the additional challenge of that large mirror on the right hand side throwing off my lighting balance, which is why the whole setup is tilted slightly to the left to eliminate any mirror reflected light from my painting surface.

*edit* it has been noted that I am pointed towards a window.  Yes, this is generally a bad idea, though I so rarely shoot paintings while the sun is up that I did not even think about it.  If needed, I'll simply angle myself so that it is not in the camera's frame.  The curtains do a fine job of thwarting any lens flare.

Camera Position.
Mount your camera to your tripod and set it a comfortable distance from your artwork.  There is a balance to reach here and it will be different with different cameras, lenses, and surfaces.  The further back you are, the less textural glare will reach you.  On the other hand, the image should almost fill the frame without resorting to any digital zooming (optical zooming is fine).  Point and shoot cameras often have digital zoom features in addition to the optical zoom, but they will degrade the image quality.  If you can’t tell whether your zoom is optical or digital, the zoom always starts in optical and will finish the last leg digitally.  You may feel the motor stop when it switches and it will likely indicate on the status screen that it is magnifying beyond the optical zoom range.  You will likely also notice the image become grainier.   Some cameras will allow you to disable the digital zoom which I would recommend doing.  

If using a camera or lens with some type of anti-shake or image stabilizing feature, be sure to turn this feature off.  When mounted on a stable tripod, the anti-shake actually creates feedback which will result in a soft image.  Some cameras and lenses are designed to correct this automatically, but many do not.

Using the view screen (and the grid overlay if available), set your tripod height and angle to be as square as possible with your artwork.  You want for your camera to be parallel and centered with the surface of your artwork.  Another reason that I like shooting with a telephoto is that it tends to give far less distortion than wider lenses, though this can be easily corrected later in the RAW conversion.  Squaring up the image with the camera is possibly the trickiest part of this whole process.

Once you have the artwork (and white balance aid if using one) correctly in your frame, focus and shoot.  Sometimes I manually focus, but usually the auto focus is dead on.  When you shoot, set the self timer so that there is a delay between pressing the shutter and capturing the photo.  This will prevent your pressing the shutter from adding any shake to the camera.  As mentioned above in the camera settings, we are shooting in Av mode, which means that the camera will automatically assign the shutter speed based on your aperture and how much light the camera is reading.  This might result in some very long exposures (for me sometimes as much as 10 seconds) during which, obviously, you don’t want to touch or disturb anything.  If the image looks too bright or dark, you can fine-tune it in the RAW conversion or (preferably) you can set the exposure level on the camera.  I typically shoot paintings at a -1/3 exposure.

Processing.
If shooting RAW, the next step will be to convert the image into a .tif file so that you can work with it in Photoshop.  I do this using Adobe Lightroom.  In the process of converting, I also automatically do three things on every image.  The first is to correct my color.  To do this, I simply select the White balance tool and click the eyedropper on my white card.  Lightroom will auto adjust temperature and tint and, though occasionally I might tweak it further, it usually dose a very good job.  The next thing I do is correct lens distortion, which is done by clicking “Enable Profile Corrections” under the “Lens Correction” menu.  Lightroom reads what lens/camera you were using and applies the appropriate template to counteract distortion and vignetting.  The final item on my checklist is to upscale my image when it processes.  To do this, I go File/Export and then under “Image Size” I select “resize to fit” and input the resolution and size that I want to export as.  My default is 300dpi and 30 inches on the longest side.  Remember that you will be cropping some of that off in Photoshop.
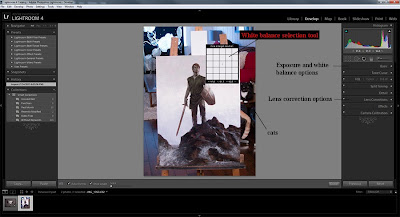
Adobe Lightroom

Once the image has converted to a .tif file, I open it in Photoshop and do whatever final adjustments are needed.  For me, this usually means cropping the image to just inside the edges of the artwork.  If it was not quite squared up, I will “select all” and transform/distort to pull the corners into place, recrop if needed and then resize to make sure that it is the correct proportions.  I then add an unsharp mask filter (the amount will depend on the size of the file) and then tweak the levels to get it nice and punchy.  Finally, if needed, I will spot heal any specks of dust or cat hair that are visible.  This only tends to be needed on darker paintings.

And that is all there is to it!  Save your file and drop in into the client’s FTP and you’re good to go!


Results.
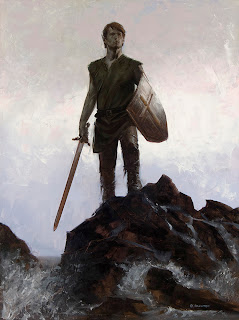
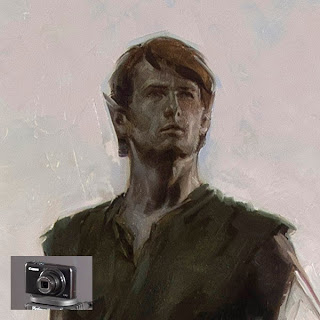
The final image taken with the Canon Powershot S90
Click for an actual pixel detail of the S90 shot image (no up-scaling in Lightroom).  I would be perfectly comfortable delivering this to a client.
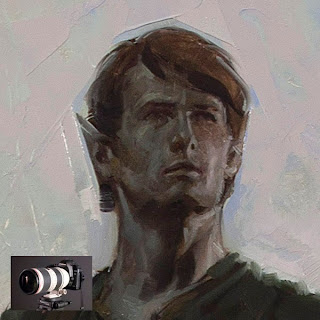
The final image as shot with the 5d Mk2.  Cleaner color, higher native resolution (about double), and slightly more subtleties in tonal range, though still the results are near identical when reduced and converted to web images.
Click for an actual pixel detail of the 5D Mk2 shot image (no up-scaling in Lightroom).

Sunday, July 7, 2013

Quickie Volume 2 pre-orders are now open!

I'm happy to announce that Quickie Volume 2 from Xupuy Ediciones is now open for pre-orders! This hardcover collection follows up where volume one left off and will feature 96 full color pages of all new material, including many never before shown drawings and paintings and even an actual introduction with reflections on the series as it has evolved over the past five years, how it began, and what it has come to mean to me. The release was originally scheduled for San Diego Comic Con, though production delays have unfortunately rolled that back into August*. The book will make it's official debut at Illuxcon in Allentown this September, but pre-orders will begin shipping about a month ahead of that. All orders received before Illuxcon will get 15% off.

Order today!

Here are some sample pages until then:

*though Quickie 2 will not be available at San Diego Comic Con, I will have an exclusive secret project for sale in it's place! I won't give any details ahead of time other than to say it is the first release in a new series that I've been working on, it will be strictly limited to 250 s/n copies, and it will NOT be available for sale online. At all. So if you want to check it out, you'll have to come find it at SDCC ;)

Friday, August 3, 2012

TOME

I'm pleased to announce that I will have work appearing in the upcoming massive art book TOME, a project of 44 Flood. More info available on their kickstarter post (which, as of my posting this, is nearly expired. what can I say, better late than never):

http://www.kickstarter.com/projects/44flood/tome-0

and images will be forthcoming :)

Saturday, March 10, 2012

Deep thoughts on style

I should be linking these as I write them. Recently I started posting some articles over at The Art Order and just wanted to put up a link here. This most recent post is an examination of style and influences in art and how these can help you grow:

http://theartorder.com/2012/03/09/honing-your-vision/

Friday, November 18, 2011

So you plan to commission a book cover?

I've been getting more than the usual number of emails lately from self publishing authors looking to hire an artist for their project. Unfortunately, the commissioning process has largely been opaque over the years with many buffers between author and artist and this can lead to some awkward attempts, ruffled feathers, general frustration, and poor results for indie first-timers. I recently gave a lengthy explanation of the commission process to an author in a series of emails and decided that it would probably be a good thing to rewrite this into a big ol’ blog post and share that info publicly.

First things first, the question I heard most often at World Con earlier this year was not “what is the commission process?”, but rather “how do I find an artist?” There are a few very good resources for doing this. The first and most obvious is to just browse the local book store and look for the artist credits listed on the book jackets. Most any working illustrator’s email is a very quick google search away, so once you’ve identified someone who’s work feels like a good match to your own, getting in touch with that person should not be difficult. Another resource is the Spectrum Annual, which is put out every year showcasing some of the best of the field of SF/F artwork and can be found at most any bookstore and easily ordered online. Another avenue is to go to SF/F conventions and do some face to face networking. Finally, there are many online art communities and galleries which provide access to literally tens of thousands of artists around the world. Some to check out would be CGhub.com, deviantart.com, and theartorder.com

Once you’ve found your artist(s), your next step is to make contact. Here is where the process begins. First, the particulars of the contract are agreed on, those being: the budget, the rights being purchased, and the due date for the final art. Contracts can cover other issues as well, but those three are the root of it. For cover commissions, there are standard practices which can at least serve as a starting point (if you're thinking to yourself that you wouldn't know where to begin). There is almost always flexibility for negotiation, these are just industry standards:

-Standard cover rates with a major publisher average at $3000, and this can be higher and lower depending on a number of factors (size of the company, wrap around images, time frame, etc.). Mid level publishers generally pay more in the $1200-$2500 range. Small press is likely under $1000. Keep in mind what clients the artist is regularly working with when planning your budget. Time spent on your project is time away from another, so it would be difficult for an artist to justify cutting their rate dramatically.

-The rights purchased are typically First Reproduction Rights (either North American or Worldwide) which means that the publisher has the first printing rights to the image (as oppose to if the image had been already used on, or was simultaneously being used on, another product). This is a limited usage (the publisher does not own the copyright, they are leasing printing rights) and the artist retains long term rights of the work as well as the original painting. Many times, second usage rights may be available on an existing image and may be easier to secure for a lean budget. If you know of a particular piece which the artist has done that might work well for you, ask if 2nd use cover rights are available. Personally speaking, I feel it’s best to avoid work which has appeared on a book cover previously, but there are many other places to look. Of course, this is easiest with more general subject matter like a spaceship or landscape.

-The due date is probably the most varied of these issues. It generally just depends on the specific needs of the publisher and how well the artist can accommodate those needs. Common turn around tends to be about 2-3 months, though sometimes an artist can take very short deadlines and other artists are consistently booked four months ahead and need at least as much time to add a new project to their schedule.

Once the specifics of the job have been determined, the artist will prepare rough sketches for the client. These are sometimes made from a specific concept which the client has already selected, or from the artist reading the manuscript and presenting their own concepts. In either case (or situations which are something in between), I personally feel that the most successful covers often come from an art director choosing the artist who naturally fits to the subject and tone of the story and then allowing the artist to find their own solutions without micromanaging. I'm not sure how that sounds coming from an artist, but the principle is the same of any professional you might hire: This person is presumably an expert and you get the most value by presenting them your problem and letting them present solutions. Good communication always leads to the best results.

Once a sketch has been agreed on, the artist then creates the final image to be delivered on or before the agreed on due date. Hopefully the image will satisfy both the artist and the client, though occasionally revisions will be needed. Small revisions are things like refining or correcting certain details which might not have been totally clear in the sketch, or making other adjustments which could not have been foreseen and wouldn't require a major repainting. Heavy revisions would be making changes which would require heavy reworking of the image and almost always are issues which should have been discussed at the sketch phase. Small revisions are typically done at no additional expense (except when more and more and more are requested, this is often stipulated in the contract), Heavy revisions usually come with an additional fee which is negotiated at that time. Heavy revisions are pretty rare in publishing, that tends to happen more in advertising and other industries where concepts can change dramatically after the sketch had been approved. There’s really no excuse for it in cover illustration unless somebody failed to do their part correctly.

Once the final artwork is approved, the client pays the artist whatever amount is due (some contracts have half paid up front and half on completion, some have the full balance due on completion) and the artist delivers the image, which these days is typically done in the form of a high resolution digital file by FTP or some other file delivery system (dropbox, yousendit, etc.)

At this stage, the cover will still need design. This is not handled by the artist unless it was specifically agreed to in the contract (which is highly uncommon). Most publishers have inhouse designers, though some work with freelance designers. For self publishing, I'd urge anyone who does not have a design background to seek a professional designer because even the best cover image will fall flat if the design is sub-par. I’ve seen this happen and it’s not pretty. Nothing makes a book look cheap like bad design. Much like illustration, graphic design has its own resources and online communities.

A few final thoughts that I want to end with:

-You get what you pay for. Budgets are probably the most difficult issue for self publishing and it’s not easy, but keep this in mind. And plan to leave budget for a designer.

-Communication is critical. Honesty, politeness, and professionalism should be expected from both sides. Poor communication is at the root of almost all unsatisfactory commissions.

-We’re all on the same side. I’m amazed how much passive aggressive animosity I’ve seen online and overheard at conventions between authors and artists. Just keep in mind that everyone wants the cover to look good, the book to do well, and all parties to walk away happy. I promise you this.


David Palumbo is a second generation professional illustrator and current art director for Night Shade Books.

Monday, August 15, 2011

Reno Worldcon 2011 Schedule

For those attending Worldcon in Reno this week, here's my scheduled events:

Wed 16:00 - 17:00, Getting Started in Illustration (Panel), A01+6
(RSCC)
Established artists answer questions about the business
side of being an artist: Promoting yourself, building your
portfolio, networking; what are the important steps to get
your foot in the door as an illustrator, and then succeed?
-David Palumbo, Anthony Palumbo, Bob Eggleton, Richard Hescox, John Picacio

Thu 11:00 - 12:00, Collaboration in Game Design: Designers and
Artists (Panel), A01+6 (RSCC)
How does the art influence the design of RPGs and video
games?
-Howard Tayler, Jon Schindehette, David Palumbo, Tom Lehmann, Dave Howell, Tanglwyst de Holloway

Thu 14:00 - 15:00, Vallejo Does Tarot (Panel), A02 (RSCC)
Boris Vallejo and his family have been illustrating their
own marvelous version of a Tarot card deck. Come see for
yourself and hear about this collaborative project.
-Boris Vallejo, Julie Bell, Anthony Palumbo, David Palumbo

Thu 19:00 - 20:30, Meet the Artists (Event), Hall 2 Art Show (RSCC)
Here's a chance to talk to the showing artists about their
own work, in the Art Show! All the attending artists who
can make it will be by their displays.

Fri 11:00 - 13:00, Art Portfolio Reviews (Workshop), A18 (RSCC)
Art GoH and Art Directors review portfolios of aspiring
Artists. Advance Registration Required - email
art@renovationsf.org
-Jon Schindehette, Lou Anders, Boris Vallejo, David Palumbo, Irene Gallo, Liz Argall

Sat 11:00 - 12:00, Building Your Art Portfolio (Panel), A16 (RSCC)
Whip together all of your art pieces and voila! You have
your art potfolio all ready to go! It's that simple, right?
-Jon Schindehette, David Palumbo, Liz Argall, Lee Moyer, Karen Haber

Sat 11:00 - 12:00, Meet the Artists (Event), Hall 2 Art Show (RSCC)
Here's a chance to talk to the showing artists about their
own work, in the Art Show! All the attending artists who
can make it will be by their displays.

Sat 12:00 - 13:00, Painting for Collectible Card Games (Panel), D03
(RSCC)
A lot of amazing artwork goes onto collectible game cards.
What's it like painting for that market? How is it
different from other projects?
-Martina Pilcerova, Jon Schindehette, Kaja Foglio ,David Palumbo


Sat 15:00 - 16:00, Autographing: Sat 15:00 (Autographing), Hall 2
Autographs (RSCC)
-Julie Bell, Boris Vallejo, Anthony Palumbo, David Palumbo, Winona Nelson

Sun 12:00 - 13:00, Marketing Yourself on the Web (Panel), A05
(RSCC)
Does web site design still matter in the age of social
media? How should a nontechnical artist or author approach
the question of how to market yourself electronically?
-Lee Moyer, Jon Schindehette, David Palumbo, Mignon Fogarty, Tara O'Shea

Sun 14:00 - 15:00, Book Cover Design: Using Cover Elements to their
Best Advantage (Panel), A04 (RSCC)
There's more to a cover than the artwork: fonts, blurbs,
title and name placement all have a huge impact on the
final effect. How to design book covers that make the best
of their art, author, and other material.
-Lou Anders, David Palumbo, Irene Gallo


See you there!

Friday, July 15, 2011

Convention season is here!

Hey all, just a quick mention of the shows I'll be attending these next few months!


San Diego Comic Con (July 20-24)


I'll be showing once again in San Diego with Daren Bader at 4914, next door to the mind blowing Allen Williams. Anyone attending should stop in and say hello, we'll be there all weekend with originals, books, DVDs and prints. Now that my prep is finished and the materials are enroute, I can say without hesitation that I'm really looking forward to a weekend of seeing old friends, buying amazing new art books, and soaking up some concentrated inspiration :D

Worldcon (Reno NV, Aug 17-21)

Boris is this year's Artist Guest of Honor at Worldcon, so the whole family is heading out. I'm already scheduled for a whole slate of programs about art and the illustration business, along with portfolio reviews along side Boris, Lou Anders (Pyr Books), John Schindehette (Wizards of the Coast), and others. Actually, there's a ton of cool art programming going on, check out John Picacio's blog for more info.

Dragon Con (Atlanta GA, Sept 2-5)

It was my pleasure this year to participate as one of the art show jurors, so I'll be out as a guest taking part in the art show events as well as some other programing. I know for sure I'll be doing a presentation on promotion and job hunting for freelancers as well as a big group panel about the Tarot set that we have coming out next year. I've never been to a Dragon Con but *everyone* has been telling me I need to go and I'm very excited to finally check it out.

Illuxcon (Altoona PA, Nov 3-6)

Wrapping up 2011 close to home at my favorite of all conventions: Illuxcon. A quiet, pleasant weekend of art overstimulation and inspiration with some of the most amazing people you'll ever meet. How can it get better than that?

Wednesday, March 16, 2011

Strength

Amazingly, the tarot series is nearly finished! I believe I only have three more to do before my 19 are all in, and we're expecting all 78 pieces to be done by the end of the summer. This is my most recent, catching up on more Major Arcana with Strength (which I was very surprised to see had not yet been claimed!)


14x21, oil on illustration board

***ALSO***

A few days ago I learned that I had received TWO medals in this year's (upcoming) Spectrum. I was awarded the Gold in the book category for Gods War and the Silver in the comic category for Sleep. Spectrum has come to be one of the two milestones of my creative year (the other being San Diego Comic Con) when I stop and assess where I've been and where I intend to go. It's a wonderful opportunity to reflect and a strong motivator to push further and explore, and I'm tremendously honored to have been selected for these awards. :D

Sunday, September 26, 2010

An interview with Scott Altmann

I'm running a day late on my end here, but I'll be sharing a booth in the upcoming New York Comic Con with fellow illustrator and very good friend Scott Altmann and he asked me the other day about doing an artist on artist interview for our blogs. You can find my answers to Scott's questions over on Scott's blog

And before I begin with my questions to Scott, I'll give a little intro just in case you may not be familiar with his name. In addition to numerous appearances in fantasy art anthologies such as Spectrum and Society of Illustrators, Scott has firmly established himself in the young adult book cover field working for heavies like Harper Collins, Random House, and Penguin to name just a few. He's painted Magic cards, done freelance concept art, is a founding member of Gorilla Artfare, shown in galleries across the US and in Europe, and was this years Chesley Award Winner for Best Paperback Cover Illustration.

You can find his work, contact info, and all that sort of thing at his website and blog:
ScottAltmann.com
Bad Dreams Good Nightmares


And now the interview:
I'll start things easy. Since isolated color is meaningless without context, what’s your favorite color scheme?

I don't think I have a favorite, as much as I go through phases. I am definitely coming off a "brown phase" where I was really preoccupied with cool tones over warm, earth tones. For instance, a cool gray over a raw umber tone. Lately, I have been really into grays, pinks, and cerulean blues.

As an illustrator who’s very prolific in the YA field, what were your favorite books when you were 12 and did the cover art have any influence over you?

I have to admit at 12, I put down the books a bit and I got really into Conan comics and Heavy Metal (the magazine - not the music). For some reason I never really got into superheroes, and my dad kind of realized that and he would bring me home these comics all the time. There was one book I constantly looked at from when I was even younger. I mention it , just because I kept revisiting it over and over and I still have it. It's called "Chinese Fairy Tales" and I believe it is out of print now: http://www.amazon.com/Chinese-Fairy-Tales-Marie-Ponsot/dp/B000RC0CK4
It has really beautiful illustrations on the interior as well by Serge Rizzato. I'll have to show you when I see you. I can't even remember the stories in the book, but some of the imagery really made an impression on me.

I also used to read a good deal of my dad's National Geographic mags, and they always had at least a few illustrations that were really cool to see.

Which painting of yours presented the greatest challenge to you while you were working on it? With the lessons that it taught you, is there anything that you would have done differently in retrospect?

Hmmm....that's hard to say. The recent Microvisions piece was tough because of the size


I was experimenting with a lot of palette knife work, which was really hard to do on the small 5" x 7" surface. I probably should have put away the palette knives, opted for less textural effects, and stuck with synthetics or sables.

The other painting that comes to mind, was a digital illustration I did for Random House and that was Chris Grabenstein's "The Hanging Hill".


The story was so great- Chris is such a skilled writer and this was my first job for Random House, so a lot of the challenges of this painting I put on myself were self-imposed pressures. Then when the art direction was to have a scary house, and NO FIGURES I panicked a bit. I had never done an illustration that the focus was on something that was something other than a human figure. How was I to make a house interesting enough for a cover?

I think I learned that I was placing too much emphasis on subject matter, and I should have focused more on compositional effects, picture dynamism, and narrative I figured that out in the long run, but I could have spared myself all the stress and anxiety!

As your professional career has been unfolding, what are your reactions to the direction that you’re moving in? Do you feel it would have surprised you as a younger artist, or has it all followed your early plans and goals?

I think I am eternally dissatisfied with my work and career, but not really in a negative way. That makes no sense when I say it out loud, but it has more to do with just always looking forward and looking to evolve. I have definitely moved into a market geared towards younger audiences, and it will probably keep going in that direction. Of course I get the urge to do more mature illustration once in awhile, but I feel this market plays to my strengths as an illustrator.

I'm honestly surprised by it all when I stop and think about it. I can't believe I get paid to do this as a living sometimes. My early goals and plans were either non-existent or vague , but now that I have goals and a decent momentum I'm excited and just want to keep pushing forward.

With your schedule full balancing illustration commissions and family life, do you ever find the time for personal painting these days? If so, what is it that matters to you most in doing them?

It's hard -I cannot lie. My days are packed from morning to night with various family/house/ illustration obligations so finding that time is a real struggle for me. . I've only gotten to sneak in a small painting here and there for myself.
There is a positive side though. Now that my illustration career has started to take shape, I feel I can now more clearly separate my job from my personal work. There's no more pressure for me to have gallery owners like it, or have it accepted by art buyers. Now it's really just for my own expression and experimentation . Just need more time to do it!


In terms of concept vs. technique, which is more likely to excite you in the work of another artist?

I think it's the synthesis of the two that really excites me. When an artist combines these elements in harmony it can really be powerful.

What sort of things do you feel you absorb most from other artists that ends up later in your own work?

It's definitely technical things I admire . Whether it is edgework, atmospheric perspective, or shape arrangement - I try to learn from people who are doing things better than I am. As far as narrative and concepts, that is more personal for me.

What is the one aspect to picture making which you find the most exciting to you right now?

I'm definitely feeling a renewed interest in composition , but not only arrangement of shapes but also arranging values. I think once you get a solid grasp of the basics, it opens it up to unlimited possibilities. Yes - a light figure against a dark background is very effective, but a light figure against a light background can be even more powerful if skillfully done.

***

Be sure to come visit us at the NYCC, we'll be at booth number 528 with originals, prints, books, DVDs, and awkward conversation ;)

Tuesday, July 27, 2010

FOUND: book of convention sketches - SDCC

Hey, I'm currently in possession of a book of con sketches found in my booth (4813: David Palumbo/Daren Bader) during tear-down at San Diego Comic Con. Nobody near by seemed to know who it belonged too, but it looks like a pretty serious book and I'm sure the owner is missing it. The name inside is "Doc Anthony" with a phone number no longer in service. Looks like the book dates back to '99. If you are the owner or know anyone who lost a book like this, email me at dave (at) dvpalumbo.com and we can hopefully get it returned. There will be follow-up questions to confirm the identity of the rightful owner.

Just putting the word out, please feel free to forward.

Sunday, July 18, 2010

See you in San Diego!

I'm just about out the door for San Diego Comic Con. It's always a mountain of tasks to get done before the show, but it's nearly time and I'm really looking forward to it. I'll be showing with Daren Bader again this year in booth #4813. I'll have originals for display and sale, as well as copies of the new book and DVD and all sorts of things. Stop in and say hello!

Monday, May 3, 2010

The new Quickie is officially here!


After months of work and prep, the new 2010 Quickie hardcovers are finally here! The book is bigger (10x10) and thicker (96 full color pages) than last year's model and features about 80% previously unprinted works, some of which haven't even been shown on my postcardnudes blog. I'm really really proud of this one :D


Click HERE for more info or to order. Order along with the upcoming "Painting Stephie 7" process DVD and get 50% off!


The book is also available in a very limited deluxe edition which will include an original oil postcard remarque. Deluxe editions are limited to 25 copies, click here for more information.

Also, an update for those who have asked about the process DVD: After some production delays, I've just received a delivery date of May 20th, which means that DVD and combo orders will begin shipping on May 24th.

VISIT MY NEW WEBSTORE HERE

Saturday, April 17, 2010

Just sharing some good news :)

Two pieces of new today. First is that a slightly less nude version of These Things Really Work will be the cover for a single from the upcoming Meat Loaf album for the song Los Angeloser :)

And the second piece of news is that I've just received my confirmation from Spectrum for volume 17 and the pieces selected were Living Dead 2 and The Scavenger. It's to be my fourth year in the book and every time it's been such an honor to be included. I feel like the quality just gets better and better, can't wait to see number 17 all laid out :D

Next post will have more art, promise ;)

Monday, April 5, 2010

"Stephie #7" DVD trailer is up :D


I've hinted around about my DVD for awhile now, but it's nearly finished and I'm finally able to show a peek ;)


for more info on this or on the new hardcover Quickie book also coming out next month, go to http://www.dvpalumbo.com/store.html

Wednesday, January 20, 2010

Postcard painting demo online :)

I’ve been fussing with editing software and youtube for about a week now, finally got something online :) Kind of a teaser for the full length process DVD that I’ll have out this spring… oh, and there’s a new book coming too, but more on that later ;)


the finished piece without all the video compression:


5x7, oil on illustration board

Tuesday, November 3, 2009

Visions of Never

this is kind of a side post, but Pat Wilshire (founder of the upcoming Illuxcon) was good enough to share a sneak peek at his new book Visions of Never with me recently and now I'm really eager to get my own copy :)

The book features six fantasy illustrators (Paul Lehr, Don Ivan Punchatz, Richard Bober, Robh Ruppel, Marc Fishman, and Mark Zug), a couple of whom I hadn't even been aware of prior to seeing the book but their contributions are all beautiful. Anyhow, just giving Pat a little plug here. See you at Illuxcon!

Wednesday, July 22, 2009

SDCC! London Miles Gallery! Quickie ships!

So things have been in fast forward this past week getting ready for San Diego Comic Con, which opens today! I've been here since yesterday morning setting up the booth and catching up with long distance friends (and trying to catch up with sleep). If you're hitting the show this weekend, stop by and see us at booth 4813, I'm sharing with Daren Bader (who's just released a beautiful hardbound collection of his illustrations) and Scott Altmann. I'll have originals (illustrations and postcards), as well as new catalogs, copies of Quickie, and a variety of prints. Come say hi :D

Also, Quickie preorders shipped on Monday! They're on their way to the four corners of the globe, thanks again to all who preordered!


And finally, I'll be taking part in a group show at the London Miles Gallery
which opens this weekend. I'm really excited to see how it goes, it looks like a good show and I wish that I could be there to see it! The show is called Candy Coateded Canvas and the theme as described: "[art] which is visually extremely colourful and playful, whilst sparking up memories of childhood, sweets, fantasy lands and those naughty but nice pleasures in life."

My two below along with the show ads:


Thursday, June 11, 2009

QUICKIE: 58 Erotic Portraits. Pre-order now!

ok, so... Big announcement time!

...

So, I'm really REALLY pleased to announce that in the very near future I'll be releasing a volume of selected images from my postcard series (year one) as well as related work. The book will be a square format 8"x8", 60 pages, and limited to 150 s/n copies. The books are going to be available late July (I'll have them for San Diego Comic Con) but I'm now taking pre-orders. Pre-order copies are priced at $20 each (plus shipping). Why pre-order you ask? Well...

*The first 50 orders will also receive an original sketch (similar to the ones below) tucked inside*

Honestly, I'm just really excited about this. I've been having so much fun doing these paintings and it makes me so happy to see them compiled into this book. They'll be back from the printers in mid-July, orders will ship asap.

click here to reserve a copy


Wednesday, March 25, 2009

Russian nesting dolls

So awhile back, I was invited by Lana Crooks to participate in a show of custom Russian nesting dolls (you know, those little dolls that stack inside each other?) at the A.Okay Official gallery in Chicago. I was kind of at a loss to how to approach it since it's a little outside my normal thing, but in the end I decided on a sequential theme as oppose to a collection theme. These are probably the smallest figures I've ever painted (starting at 5" tall and ending at 1.5") and also the first time I've used acrylics for anything other than underpainting since I was in school, so I was pretty happy that it actually even looked like anything in the end :P

Honestly, I'm really happy with how they came out. As is always the problem with dimensional work, these just aren't the same in photos, but I'll try:


And close-ups of each individual doll: